Latte art is the practice of pouring steamed milk into espresso in a way that creates a visible pattern on the surface of the drink. The heart is the simplest pattern to learn and the foundation for everything that follows — tulips, rosettas, and swans all build on the same pouring mechanics.
The skill has two distinct components: steaming milk into proper microfoam, and pouring that foam in a controlled stream. Most beginners focus entirely on the pour and neglect the steam. That is backwards. If your milk is not textured correctly, no amount of pouring technique will produce latte art. The canvas has to be right before you pick up the brush.
What You Need
Espresso. Latte art sits on top of crema — the thin, golden-brown foam layer on a fresh espresso shot. Without crema, the milk has nothing to contrast against. You need a shot pulled within the last 30 seconds from beans no more than 3-4 weeks past roast. Stale beans produce no crema and fast, flat extraction. For help with shot timing and troubleshooting, see the espresso dial-in guide.
A steam wand. Any espresso machine with a steam wand works: the Breville Bambino Plus, Gaggia Classic Pro, Rancilio Silvia, or anything in the espresso machine guide. Pannarello-style wands (with a plastic sleeve that auto-froths) generally produce too many large bubbles for latte art — you need a bare tip that lets you control air intake manually.
A milk pitcher (jug). A 12 oz (350 ml) pitcher for single drinks, or 20 oz (600 ml) for doubles. The spout shape matters: a pointed spout gives more control for detail work. Start with a standard pointed-spout pitcher.
Whole milk. At least to learn with. Whole milk has roughly 3.4% protein and 3.5-4% fat, which together create the most stable, dense microfoam. Skim milk foams more easily (higher protein-to-fat ratio) but produces lighter foam that separates faster. Whole milk produces the dense, tight microfoam you need for defined latte art patterns with better mouthfeel.
The Milk Science
Understanding why milk behaves the way it does helps you troubleshoot problems faster than following rote instructions. For a deep dive into steaming technique and dairy chemistry, see the full steaming guide.
Casein proteins (80% of milk protein) form micelles that create the structural scaffold of foam. Whey proteins (20%) are heat-sensitive. During steaming, whey proteins denature and migrate to bubble surfaces, forming flexible films that stabilize each microbubble. This is what makes microfoam possible — denatured whey proteins wrapping each tiny air bubble in a flexible protein shell.
Fat matters. Below 40°C, milk fat is partially solid. Those solid fat crystals puncture bubble membranes, destroying foam. This is why cold milk froths poorly initially — the fat is working against the foam. Once milk warms past 40°C during steaming, fat melts fully into liquid form. Liquid fat contributes richness and body without destroying bubbles. This is also why you steam cold milk from the refrigerator: you get a longer window to incorporate air before the milk heats up.
The sweetness window. Lactose in cold milk is not particularly sweet. At 65-68°C, lactose breaks down into glucose and galactose, both of which are perceptibly sweeter. This is why properly steamed milk tastes sweeter than cold milk — no added sugar needed. But above 68°C / 154°F, milk proteins denature irreversibly, sweetness drops, and a cooked, sulfurous taste develops.
Target temperature: 55-65°C (130-149°F). This is the specialty coffee standard (Hoffmann). Rao allows up to 150-160°F for those who prefer a hotter drink. Do not exceed 68°C / 154°F — the milk will taste burnt and the foam will break down.
How to Steam Milk: The Two Phases
Steaming has two distinct phases. They are sequential, not simultaneous.
Phase 1: Stretching (Incorporating Air)
This is the phase where you add air to the milk. Place the steam tip just below the surface of the milk — roughly 1-2mm below. The tip should be slightly off-center toward the side of the pitcher, which creates a vortex.
Open the steam valve fully. You should hear a rhythmic “tsk-tsk-tsk” sound as the tip sucks tiny amounts of air below the surface. If you hear screaming (too deep) or big sputtering sounds (too shallow, too much air), adjust the depth.
Complete all stretching before the milk reaches 100°F (38°C). Above this temperature, creating quality froth becomes nearly impossible (Rao). You have roughly 5-8 seconds depending on your machine’s steam power.
For a latte (light foam), add roughly a quarter inch of volume. For a cappuccino (more foam), add roughly a half inch.
Phase 2: Rolling (Texturing)
Once you have incorporated enough air, plunge the tip deeper into the milk — roughly halfway down the pitcher. This stops air incorporation and begins rolling the milk in a tight vortex.
The vortex does two things: it heats the milk evenly (no hot spots near the tip, cold spots far away), and it breaks large bubbles into progressively smaller ones. Each revolution through the vortex, the whey proteins fold around smaller and smaller bubbles, creating the glossy, paint-like texture called microfoam.
Keep rolling until the pitcher is too hot to hold comfortably against the side of your palm for more than 2-3 seconds. That corresponds to roughly 55-65°C. Do not use a thermometer while you are learning the pour — it is more important to learn the feel.
Kill the steam valve. Remove the pitcher. Immediately wipe the wand with a damp cloth and purge briefly (steam blast to clear milk from the tip).
What Good Microfoam Looks Like
Hold the pitcher at eye level and look at the surface. Good microfoam looks like wet white paint — glossy, smooth, and uniform with no visible bubbles. If you see individual bubbles, the texture is too coarse. Tap the pitcher firmly on the counter to pop any surface bubbles, then swirl the milk gently in a circular motion for 5-10 seconds to reintegrate the foam with the liquid.
If the surface looks dry, matte, or lumpy, you incorporated too much air (over-stretched). If it looks like plain milk with no body, you did not incorporate enough air.
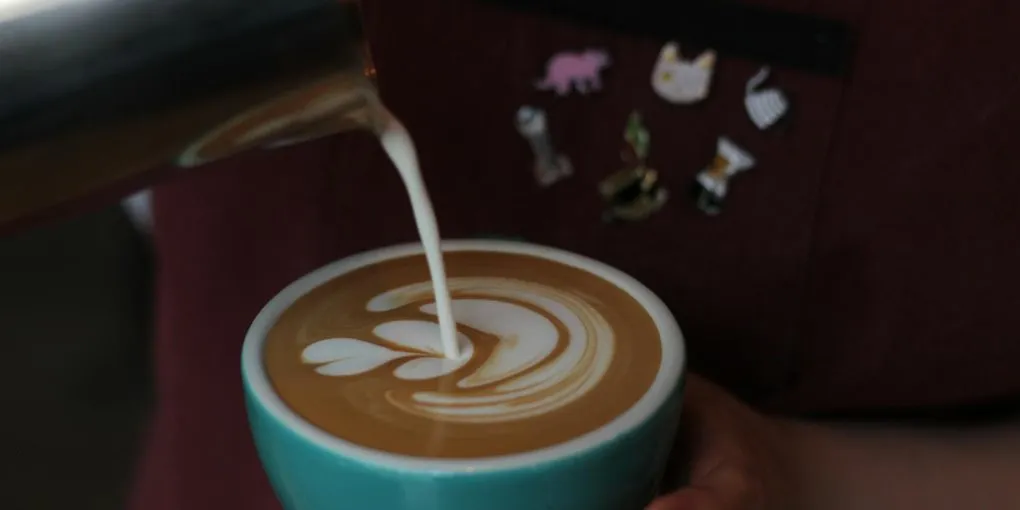
The Heart Pour: Step by Step
The heart is the simplest latte art pattern because it requires only one technique: lowering the pitcher to pour on the surface, then cutting through the pattern to create the point.
Step 1: Prepare your espresso. Pull your shot into the cup. For the best canvas, use a wide-mouthed latte cup or cappuccino cup. The crema should be even and covering the surface.
Step 2: Start high, pour thin. Hold the pitcher 3-4 inches above the surface of the espresso. Pour a thin, steady stream of milk into the center of the cup. At this height, the milk penetrates below the crema and mixes with the espresso. This is where you build the drink’s base — roughly the first two-thirds of the cup’s volume.
Pour slowly and steadily. The milk disappears under the brown crema. The cup fills from below while the crema stays on top.
Step 3: Drop the pitcher, pour on the surface. When the cup is roughly two-thirds full, bring the spout of the pitcher down to nearly touch the surface of the coffee — within half an inch. Simultaneously, increase your pour rate slightly.
This is the critical moment. When the spout is close to the surface, milk no longer dives under the crema. Instead, it skims across the top, spreading white foam over the brown crema. A white circle starts forming. Keep pouring steadily — the circle grows.
The physics here is simple. Raising the pitcher is like diving from a high board: the milk plunges deep. Lowering the pitcher is like stepping off the pool edge: the milk stays near the surface. Close spout equals milk skimming the top.
Step 4: Cut through. When the white circle reaches the size you want (roughly the diameter of the cup minus a border of brown), raise the pitcher slightly and move the stream through the center of the white circle from back to front in one smooth motion. This creates the point of the heart while simultaneously finishing the pour.
Stop pouring. The heart shape should be visible — a rounded top and a pointed bottom created by the cut-through.
Common Beginner Mistakes
Pouring too fast in the base-building phase. The first two-thirds of the pour should be slow and thin. Fast pouring creates turbulence that breaks up the crema, giving you a murky brown surface instead of a clean canvas.
Pitcher too high during the art phase. If the spout is more than an inch above the surface when you want white foam to appear, the milk will dive under instead of spreading on top. Get the spout as close to the surface as possible.
Over-steamed milk. Milk above 68°C / 154°F loses its foam structure. The proteins have denatured past the point of holding microfoam. The milk becomes thin and watery on top with a layer of dense, stiff foam underneath. Neither pours well.
Waiting too long between steaming and pouring. Rao states that milk should be poured within 30 seconds of steaming. The mouthfeel before foam and liquid separate is far superior to the same drink a minute later. Microfoam starts separating the moment you stop rolling it. Swirl the pitcher to reintegrate, but do not wait.
Not enough crema. If your espresso has thin or no crema (stale beans, old grinder, pre-ground coffee), the milk has nothing to contrast against. The art requires brown crema for the white foam to sit on. Use beans within 2-3 weeks of roasting and a proper espresso setup.
Tilting the cup too early. Some tutorials suggest tilting the cup toward you during the pour. This helps advanced pourers manage the pour in deeper cups. For beginners, keep the cup flat on the counter. Tilting adds a variable that makes it harder to build consistent muscle memory.
Practicing Without Espresso
Steaming technique is the harder skill, and you can practice it independently.
Water + dish soap: Fill your pitcher with water and add a drop of dish soap. Steam it like milk. It foams similarly and lets you practice tip positioning and phase transitions without wasting milk.
Pour into a cup of water with food coloring: Put dark food coloring in a cup of water to simulate crema contrast. Practice your pour height transitions and cut-through motions. The “art” will not hold like real latte art, but the muscle memory transfers.
Steam milk, drink the result: Just practice steaming and drinking lattes or cappuccinos. Each steam session teaches you something. Focus on getting the microfoam right before worrying about the pattern.
Beyond the Heart
Once you can consistently produce a clean heart, the next pattern is the tulip (multiple hearts stacked vertically, each pushing the previous one back) and then the rosetta (a fern-like pattern created by wobbling the pitcher side to side during the pour).
Both patterns use the same two core mechanics you learned with the heart: high pour to build the base, low pour to paint on the surface. The differences are in timing, wobble frequency, and pour rate modulation.
For more on milk steaming fundamentals, including plant-based milk alternatives and their latte art capability, see our steaming guide. The latte art ranking for non-dairy options runs: oat barista editions perform best, followed by soy barista editions, pea protein, hemp barista, macadamia, coconut, and almond (worst — only 1g protein per cup, which cannot sustain microfoam).
Equipment Recap
| Item | What to Look For | Price Range |
|---|---|---|
| Espresso machine | Bare steam wand (not Pannarello), adequate steam pressure | About $300-500 entry |
| Milk pitcher | 12 oz for singles, 20 oz for doubles, pointed spout | About $15-30 |
| Fresh beans | Within 2-3 weeks of roast date for good crema | About $12-20/bag |
| Whole milk | 3.4% protein, 3.5-4% fat — the best foam substrate | About $4-6/gallon |
| Thermometer (optional) | Clip-on milk thermometer to check your temperature instincts | About $5-10 |
The entire additional investment beyond an espresso machine is roughly $20-40 for a pitcher and a thermometer. The rest is practice — and milk.
Frequently Asked Questions
- What temperature should I steam milk to for latte art?
- Target 55-65°C (130-149°F). At 65-68°C, lactose breaks down into glucose and galactose, making the milk taste sweeter without added sugar. Above 68°C / 154°F, milk proteins denature irreversibly — sweetness drops, a cooked taste develops, and foam structure breaks down. The practical test: the pitcher should feel too hot to hold against your palm for more than 2-3 seconds.
- Why does my milk have big bubbles instead of smooth microfoam?
- Big bubbles mean you incorporated air for too long, at too shallow a tip depth, or at too high a milk temperature. All stretching (air incorporation) must be completed before the milk reaches 100°F (38°C) per Scott Rao. After that, plunge the tip deeper and roll the milk in a vortex to break large bubbles into microfoam. If you still see individual bubbles after steaming, tap the pitcher on the counter and swirl vigorously for 5-10 seconds.
- Can I make latte art with oat milk or other plant-based milks?
- Oat milk barista editions (Oatly Barista, Minor Figures Barista, Califia Barista) produce smooth microfoam suitable for latte art and are the best-performing non-dairy option. Soy barista editions also work well, with 7-8g protein per cup providing good foam stability. Almond milk has only 1g protein per cup and cannot sustain microfoam. Steam plant-based milks to a lower temperature (60°C max for oat) than dairy.
- Why can I steam good foam but the art does not show up?
- The most common reason is pouring from too high. When the pitcher spout is more than an inch above the coffee surface, milk dives under the crema instead of spreading across the top. The fix: pour from high to build the drink base (first two-thirds of volume), then drop the pitcher spout to within half an inch of the surface for the art phase. White foam only appears on top when the spout is close enough for milk to skim rather than dive.
- How long does it take to learn latte art?
- Most people can produce a recognizable heart within 1-2 weeks of daily practice (one or two attempts per day). Clean, symmetrical hearts typically take 2-4 weeks. Tulips and rosettas require another month or two of practice beyond that. The limiting factor is usually steaming consistency — once you can reliably produce glossy microfoam, the pouring patterns come faster. Practice steaming with water and dish soap to build technique without wasting milk.